Introducing the Cloud CMS Open Source App Server
Mar 31
Cloud CMS lets you create content once and reuse it everywhere - across all of your devices, web sites, mobile applications, tradeshow kiosks, digital signage surfaces and more. Our editorial environment is fully featured, extensible easy to use, letting you manage content and deliver it via our enterprise-class Content API.
With Cloud CMS, customers are free to build apps on top of best-of-breed open-source frameworks while leveraging open-standards. They are empowered to continue to use the development platforms they choose - whether that’s .NET, Java, Node.js, PHP or anything else.
In other words, Cloud CMS plays well with others.
Introducing the Cloud CMS Application Server
There is another reason why companies choose Cloud CMS. It is because we offer an open-source, Node.js Application Server for three-tier architectures.
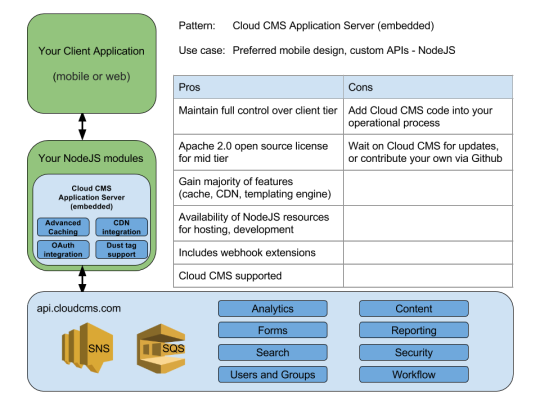
When customers ask us what architecture we recommend, we invariably recommend a three-tier architecture. It involves a middle tier (known as an Application Server) that provides application-specific services for your mobile or web application. It’s not only more secure but it’s also possible to optimize the request chain to make your apps snappy and responsive.
Why? Well, suppose you had a mobile app that connected to an API in the cloud. Suppose it had to make 10 different API calls to collect the information it needed to draw the page. Can you imagine trying to do that over a 4G connection with a low battery? It’s a good way to kill a phone - but not a good way to build responsive applications that your customers will love.
It also opens up a security liability. Any security credentials you need to connect to the API will have to be on the phone. Which means they can be found and discovered. It’s harder to do within native applications, true, but it’s actually quite easy to do with HTML5/JS applications.
Which is why generally recommend not to do it. Instead, we suggest using a middle tier Application Server.
The Cloud CMS Application Server is an optional Node.js/Express-based server that provides presentation services for your sites and applications. This includes:
- Optimized HTTP headers and performance caching
- CDN integration and invalidation
- Web Content Management
- Dust.js Templates with Template compilation and page caching
- User Authentication and Registration
- Static Asset Caching
- Instant Preview and Scheduled Publishing
And much, much more!
Open Source Ecosystem of Plugins
The Cloud CMS Application Server has become quite popular. Much of this popularity is due to its reliance open-source and a worldwide community of open-source developers. The product is designed to snap in very naturally with Node.js and Express.
The Node.js developer community is worldwide and expansive. For our customers, this means that there is an available and lower-cost pool of development talent at their disposal.
It also means that there is an active eco-system of modules, plugins and open-source tools available. These assets represent a worldwide convergence of thought on best practices in web design, architecture and coding.
Best of all - it’s all open-source.
It continues our tradition at Cloud CMS of building and supporting open-source libraries. It began 5 years ago with the leading Alpaca Forms Engine and has continued with all of our drivers, SDKs, documentation samples and more. We put everything under the permissive Apache 2.0 license so that there are no strings attached.
The Cloud CMS Application Server is the latest to join this family. It is now available under the Apache 2.0 license just like its sibling products. It is available today for you to use in building awesome Cloud CMS applications.
Getting Started
The conventional way to get started with the Cloud CMS Application Server is to install into your Node application, like this:
npm install cloudcms-server --save
This will add the dependency to your package.json file. You can then start up the server within your app.js file like this:
var server = require(“cloudcms-server”);
server.start();
This is a no-configuration startup. Nothing fancy. It will begin serving back content from the ./public directory - HTML, CSS, anything that you have. Basically, like a really simple web server!
Connecting to Cloud CMS
To connect your Application Server to Cloud CMS, grab a copy of your application’s gitana.json file and drop it in next to your app.js. Restart the Node process. The file will be picked up and your Application Server is now ready to communicate with Cloud CMS.
Let’s add a custom API method that retrieves a list of products. Imagine you have a Cloud CMS project with a custom content type called my:product. You can register a controller method like this:
server.routes(function(app, done) {
    app.use("/products", function(req, res, next) {
        req.branch(function(err, branch) {
            branch.queryNodes({
                "_type": "my:product"
            }).then(function() {
                res.json(this);
            });
        });
    });

        done();
});
Restart your Node process and then open a browser to:
http://localhost:2999/products
And you’ll see your JSON come back!
Images, Video and Static Assets
The Cloud CMS Application Server is all wired up to pull down static assets including video and images from the Cloud CMS API.
Let’s say you have a content node in Cloud CMS with a binary attachment on it. You’d like to show it inside of your web site. No problem. Use the following path:
/static/node/<nodeid>/<attachmentid>/<filename>
The binary is pulled back from the Cloud CMS API and cached locally on the Application Server. The next request for the asset will serve from the Application Server itself instead of going back to the API.
Furthermore, if you’re running in production mode, the asset’s headers will be set so that the Application Server can act as the Origin Server in your CDN architecture. This allows the asset to cache on the CDN, removing the need to even go back to the Application Server at request time.
Configuring Features
The Application Server comes with a slew of really interesting features that you can configure by customizing the call to your start() method. These features are implemented as middleware that run in the request chain depending on whether they’re enabled and depending on how they’re configured.
Let’s say you wanted to hook up automatic cache invalidation. When content is updated in your editorial environment, you want to have the Application Server hear those changes and invalidate cache.
It’s easy! Cloud CMS lets you define an Amazon SNS/SQS topic and queue to which content lifecycle notification events are sent. You then tell the Application Server to listen for those events and act on them:
server.start({
    "notifications": {
        "provider": "sqs",
        "config": {
                    ...sqs configuration...
        }
    }
});
For the exact syntax of each configuration block, check out our formal documentation:
https://www.cloudcms.com/documentation/application-server.html
Getting your Hands Dirty
To work with the Cloud CMS Application Server, clone the following GitHub repository:
https://github.com/gitana/cloudcms-application-server
Inside, you will find two ways to get started:
- Run Node.js standalone
- Build a Docker image using the official Dockerfile
The /standalone directory contains everything you need to configure and launch the Cloud CMS Application Server in standalone mode. The /docker directory provides the official Dockerfile for use in building your own custom Docker images
Each of these approaches utilizes the “cloudcms-server” Node.js module. You can learn more about this module here:
https://github.com/gitana/cloudcms-server
Running on Docker
The provided Dockerfile makes it very easy to build custom Application Server containers with all of your custom code. The code is layered on top of the official Fedora image that provides a foundation for your application.
By building in this way, you’ll find it very easy to deploy your resulting Docker image to Amazon EC2, Rackspace and other popular cloud providers. You’ll also gain the advantage of having a common image that all of your developers can work with, whether on their laptops or in a development/staging environment.
The Dockerfile pulls down the base Fedora image from Docker Hub. Please be sure to read through the README file provided in the GitHub project as it provides sample commands and guidance on using both approaches.
Go Forth and Build Great Apps!
When we started Cloud CMS over five years ago, we had a vision for an API-first, JSON-oriented content platform that spans your entire business.
Today, the Cloud CMS Application Server takes us a step closer to that vision by letting our customers further lower the amount of time and cost needed to develop and deploy amazing applications.
If you’re interested in learning more about Cloud CMS, we invite you to sign up for a free trial account.
